การสร้าง Class C++ ที่ใช้เป็นโครงสร้างข้อมูลแบบ Stack (กองซ้อน) เพื่อใช้งานสำหรับ Arduino
โจทย์สำหรับการทดลอง
1) เขียนโค้ดสำหรับบอร์ด Arduino โดยสร้างเป็น C++ Class ดังต่อไปนี้
=> Class StringStack เป็นโครงสร้างข้อมูลแบบ Stack (กองซ้อน) สำหรับเก็บ String objects (http://arduino.cc/en/Reference/StringObject) และกำหนด API สำหรับคลาสดังกล่าว เป็นดังนี้
=> Class StringStack เป็นโครงสร้างข้อมูลแบบ Stack (กองซ้อน) สำหรับเก็บ String objects (http://arduino.cc/en/Reference/StringObject) และกำหนด API สำหรับคลาสดังกล่าว เป็นดังนี้
#include <String.h>
class StringStack {
public: StringStack( int capacity=10 ); // constructor boolean put( String s ); // put a String object on stack boolean get( String &s ); // get a String object from stack inline int size(); // return the number of String objects on the stack inline boolean isEmpty(); // return true if stack is empty, otherwise false inline boolean isFull(); // return true if stack is full, otherwise false private: int capacity; // the max. capacity of the stack int count; // used to count the number of string objects stored String *buf; // used to store String objects on stack }; |
จงสร้างคลาส StringStack และทดสอบการทำงานโดยใช้โค้ดตัวอย่างต่อไปนี้และทดสอบโดย
ใช้ฮาร์ดแวร์จริง (ใช้บอร์ด Arduino และแสดงผลผ่าน Serial Monitor ของ Arduino IDE)
int num = 10; // capacity
StringStack st( num );
void setup() {
Serial.begin(115200); }
char buf[20];
String str;
void loop() {
Serial.print( "\nPut strings: " ); for ( int i=0; i < num; i++ ) { str = String( (i+1)*10 ); if ( !st.put( str ) ) { Serial.println( "\nPut string error!" ); break; } else { Serial.print( str ); Serial.print( " " ); } str = NULL; delay(50); } delay(500); Serial.print( "\nGet strings: " ); for ( int i=0; i < num; i++ ) { if ( st.get( str ) ) { str.toCharArray( buf, 20 ); Serial.print( buf ); Serial.print( " " ); } else { Serial.println( "\nGet string error!" ); break; } delay(50); } delay(500); } |
2) ใช้คลาส StringStack ในข้อแรก นำมาเขียนโค้ด Arduino เพื่อให้มีพฤติกรรมการทำงานดังนี้
2.1) บอร์ด Arduino มีวงจรปุ่มกด Get ทำงานแบบ Active-Low (ใช้ตัวต้านทานแบบ Pull-up, 10k)
2.2) ผู้ใช้สามารถส่งข้อความ (ภาษาอังกฤษ) ทีละบรรทัด (ไม่เกิน 20 ตัวอักขระต่อบรรทัด) จากคอมพิวเตอร์ โดยส่งผ่าน Serial Monitor ของ Arduino IDE ไปยังบอร์ด Arduino
2.3) ข้อความแต่ละบรรทัดที่ถูกส่งไปยัง Arduino จะถูกจัดเก็บใน StringStack (เก็บบนกองซ้อน) ถ้าไม่เต็มความจุ แต่ถ้าเต็มความจุ ไม่สามารถเก็บข้อความใหม่ได้ Arduino จะต้องส่งข้อความ "Full" กลับมา
2.4) เมื่อมีการกดปุ่ม Get แล้วปล่อยหนึ่งครั้ง ข้อความบนสุด (ถ้ามี) ของ StringStack จะถูกดึงออกมาแล้วส่งผ่าน Serial Monitor ไปยังคอมพิวเตอร์ แต่ถ้าไม่มีข้อความใดๆ Arduino จะต้องส่งข้อความ "Empty" กลับมา เมื่อกดปุ่มแล้วปล่อย
**เพิ่มเติม** ถ้าความจุเต็ม ไม่สามารถเก็บข้อความใหม่ได้ ให้หลอดไฟ LED สว่าง แต่ถ้าไม่มีข้อความใดๆ ให้หลอดไฟ LED อีกดวงสว่าง
อุปกรณ์ทดลอง (Apparatus)
อุปกรณ์
|
จำนวน
|
|
|
|
LED 5mm.
|
2
|
|
|
ตัวต้านทาน 10 กิโลโอห์ม
(น้ำตาล ดำ ส้ม ทอง)
|
|
BREADBOARD
บอร์ดทดลองอิเล็กทรอนิกส์
|
1
|
|
Arduino Uno R3
|
1
|
|
ปุ่มกด
|
3
|
|
สาย USB Cable
|
1
|
|
สายไฟต่อวงจร
|
-
|
Arduino Sketch (1)
ส่วนแรกเป็นการประกาศคลาสชื่อ StringStack มีเพียงเมธอดเดียวสำหรับใช้งานเป็น Constructor โดยรับอาร์มิวเมนต์ capacity ตามชนิดข้อมูลแบบ int ซึ่งจะใช้กำหนดหมายเลขสำหรับขาเอาต์พุตของ Arduino ที่ต้องใช้งานแบบ PWM ได้ และ inverse ที่มีชนิดข้อมูลเป็น boolean เพื่อกำหนดว่า จะกลับลอจิกของสัญญาณเอาต์พุต PWM หรือไม่ (กรณีที่ใช้กับ RGB LED แบบ Common Anode)
// class declaration ---------------------------------------------------------------------------------
#ifndef StringStack_h #define StringStack_h #if ARDUINO >= 100 #include "Arduino.h" #else #include "WProgram.h" #endif class StringStack { public: StringStack( int capacity=10 ); // constructor bool put( String s ); // put a String object on stack bool get( String &s ); // get a String object from stack int size_stack(); // return the number of String objects on the stack boolean isEmpty(); // return true if stack is empty, otherwise false boolean isFull(); // return true if stack is full, otherwise false private: int capacity; // the max. capacity of the stack int count; // used to count the number of string objects stored String *buf; // used to store String objects on stack String array[10 ]; }; #endif
// end class delcaration ---------------------------------------------------------------------------
|
ส่วนที่สองเป็นการสร้างคลาสซึ่งเกี่ยวกับการสร้างเมธอดสมาชิกตามที่ได้ประกาศไว้ในส่วนแรก ให้สังเกตวิธีการอ้างอิงชื่อเมธอดสมาชิก
// class implementation----------------------------------------------------------------------------
#include "StringStack.h" StringStack::StringStack( int capacity ) { capacity = capacity; count = 0; } bool StringStack::put( String s ) { if ( isEmpty() ) { array[count] = s; //*buf = array[count]; count ++; return true; } else { return false; } } bool StringStack::get( String &s ) { if ( count <= 0 ) { return false; } else { String *buf = &s; count --; *buf = array[count]; return true; } } int StringStack::size_stack() { return count; } boolean StringStack::isEmpty() { if(count >= 10){ return false; }else{return true;} } boolean StringStack::isFull() { if(count < capacity){ return false; }else{return true;} } // end class implementation---------------------------------------------------------------------- |
ส่วนที่สามเกี่ยวข้องกับการเขียนโค้ดทดสอบ (ไม่เกี่ยวข้องกับการนิยามและสร้างคลาส) โดยสร้างออปเจคจากคลาส StringStack เขียนได้ดังนี้
// test code Problem1 -----------------------------------------------------------------------------
#include <StringStack.h> int num = 10; // capacity StringStack st( num ); void setup() { Serial.begin(115200); } char buf[20]; String str; void loop() { Serial.print( "\nPut strings: " ); for ( int i = 0; i < num; i++ ) { str = String( (i + 1) * 10 ); if ( !st.put( str ) ) { Serial.println( "\nPut string error!" ); break; } else { Serial.print( str ); Serial.print( " " ); } str = ""; delay(50); } delay(500); //Serial.print(st.get( str)); Serial.print( "\nGet strings: " ); for ( int i = 0; i < num; i++ ) { if ( st.get( str ) ) { str.toCharArray( buf, 20 ); Serial.print( buf ); Serial.print( " " ); } else { Serial.println( "\nGet string error!" ); break; } delay(50); } delay(500); } // end test code Problem1------------------------------------------------------------------------ |
เมื่อได้ทดลองการทำงานแล้ว ก็สามารถนำโค้ดดังกล่าว มาจัดแบ่งเป็นไฟล์ StringStack.h สำหรับส่วนที่ประกาศคลาส และ StringStack.cpp สำหรับส่วนที่สร้างคลาส และเก็บไฟล์ทั้งสองไว้ในไดเรคทรอรี่ชื่อเดียวกับคลาส ในการนำไปใช้งาน โค้ด Arduino Sketch ที่จะใช้คลาสดังกล่าว จะต้องประกาศการใช้งานดังนี้ #include<StringStack.h>
ไฟล์ StringStack.h , StringStack.cpp สำหรับนำไปใช้งานในลักษณะที่เป็นไลบรารี่สำหรับ Arduino
ใส่ไว้ภายใต้ไดเรคทรอรี่ชื่อ libraries ของ Arduino IDE)
ใส่ไว้ภายใต้ไดเรคทรอรี่ชื่อ libraries ของ Arduino IDE)
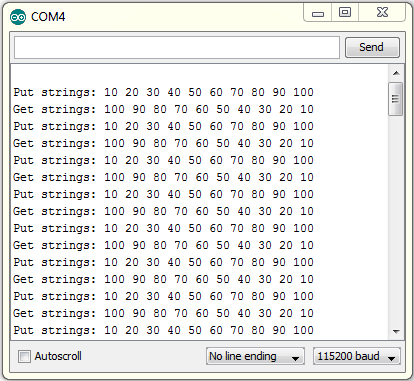
ผลการทดลองการทำงาน (1)
 |
| แสดงข้อมูลที่ใส่ stack และข้อมูลที่นำออกมาจาก stack |
Arduino Sketch (2)
การเขียนโค้ดทดสอบ โดยสร้างออปเจคจากคลาส StringStack ให้มีคุณสมบัติตรงกับโจทย์สำหรับ
การทดลองข้อ 2 เขียนได้ดังนี้
การทดลองข้อ 2 เขียนได้ดังนี้
// Test code Problem2 -------------------------------------------------------------------------
#include <StringStack.h> int num = 10; // capacity StringStack st( num ); int check=0; char count1; int nub =0; String count; char buf[20]; String str,str1; //button int empty_ledPin = 9; // กำหนด pin สำหรับ LED เมื่อ stack ว่าง int full_ledPin = 6; // กำหนด pin สำหรับ LED เมื่อ stack เต็ม int button_Pin = 2; // กำหนด pin สำหรับปุ่ม int button = 0; //กำหนดตัวแปรรับค่าจากปุ่ม ค่าเป็น 0 int state=0; void setup() { Serial.begin(115200); pinMode(empty_ledPin, OUTPUT); // กำหนดหน้าที่ของ pin led pinMode(full_ledPin, OUTPUT); pinMode(button_Pin, INPUT); // กำหนดหน้าที่ของ pin ปุ่ม } void loop(){ button = digitalRead(button_Pin); //ให้ตัวแปร button มีค่าเปลี่ยนแปลง //เมื่อมีการกดปุ่ม while(Serial.available()>0){ count1 = (char)Serial.read(); count = count + count1; if(count1 == '\n'){ check=1; } } if(check==1){ str = count; str = str.substring(0,19); check=0; count =""; nub=0; if ( !st.put( str ) ) { Serial.print( "\nFull" ); digitalWrite(full_ledPin,HIGH); } else { digitalWrite(empty_ledPin, LOW); Serial.print( "\nPut strings: " ); Serial.print( str ); delay(1000); } delay(50); } //BUTTON if (button == LOW) { //Active LOW state=1; } if(state==1 && button==HIGH){ state=0; digitalWrite(full_ledPin, LOW); if ( !st.get( str ) ) { Serial.print( "\nEMPTY" ); digitalWrite(empty_ledPin,HIGH); delay(2000); } else { str.toCharArray( buf, 20 ); Serial.print( "\nGet strings: " ); Serial.print( buf ); } delay(50); } }
// end test code Problem2 --------------------------------------------------------------------
|
ผังวงจร (Breadboard Layout)
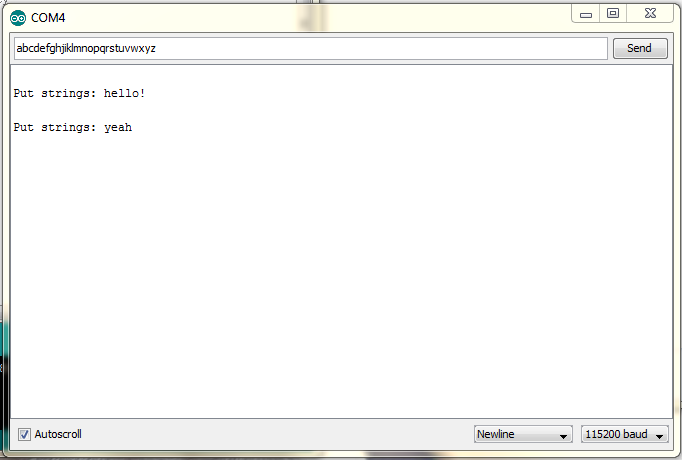
ผลการทดลองการทำงาน (2)
 |
| ส่งข้อความ (ภาษาอังกฤษ) ทีละบรรทัด (ไม่เกิน 20 ตัวอักขระต่อบรรทัด) จากคอมพิวเตอร์ โดยส่งผ่าน Serial Monitor ของ Arduino IDE ไปยังบอร์ด Arduino |
 |
| ข้อความแต่ละบรรทัดที่ถูกส่งไปยัง Arduino จะถูกจัดเก็บใน StringStack (เก็บบนกองซ้อน) ถ้าเต็มความจุที่กำหนดไว้ จะไม่สามารถเก็บข้อความใหม่ได้ Arduino จะต้องส่งข้อความ "Full" กลับมา |
 |
| กดปุ่ม Get แล้วปล่อยหนึ่งครั้ง ข้อความบนสุด (ถ้ามี) ของ StringStack จะถูกดึงออกมาแล้วส่งผ่าน Serial Monitor ไปยังคอมพิวเตอร์ |
 |
| ถ้าไม่มีข้อความใดๆ Arduino จะต้องส่งข้อความ "Empty" กลับมา เมื่อกดปุ่มแล้วปล่อย |


ไม่มีความคิดเห็น:
แสดงความคิดเห็น